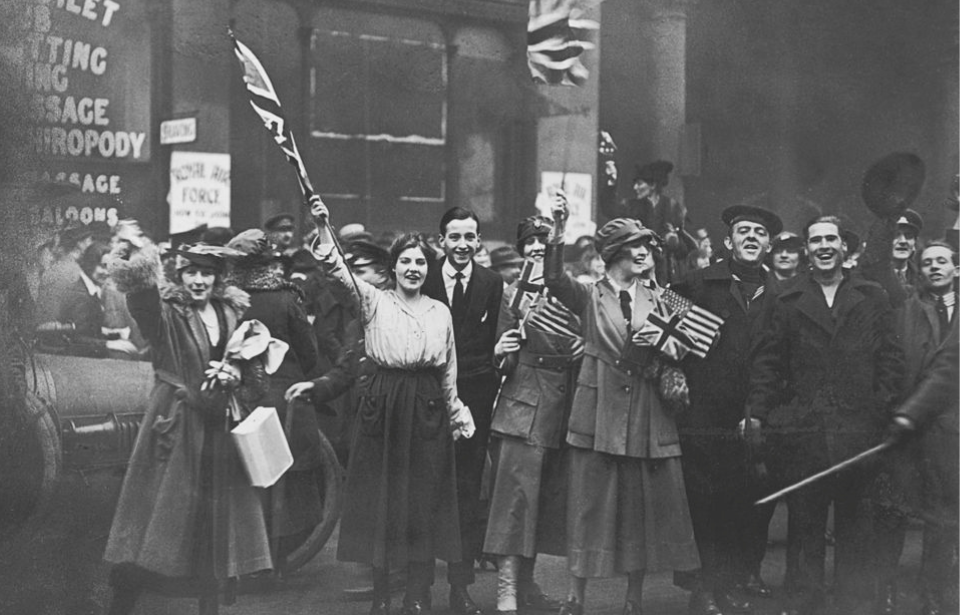
It’s a well known fact the First World War was one of the deadliest conflicts of human history, with only World War II having a higher number of war dead. However, the Great War was different, as it was the first time the world fought on such a large scale. This also meant the total number of deaths experienced was different, with towns losing large portions of their population. It’s this fact that makes the history of Britain’s “Thankful Villages” even more incredible.
Heavy casualties were experienced in World War I
King George V and Field Marshal Douglas Haig inspecting the graves of British soldiers killed at Ypres Salient, 1922. (Photo Credit: PA Images / Getty Images)
Interestingly, the United Kingdom’s military fatalities during both World Wars didn’t follow the same pattern as other countries. Internationally, more servicemen deaths occurred in World War II, but the UK suffered significantly more during the First – 880,000 between 1914-18 versus 384,000 from 1939-45.
With so many dead, it’s no wonder families across Britain heavily grieved their losses at the end of the Great War, with many villages erecting monuments in honor of those who never made it home. Interesting, there were 53 dubbed “Thankful Villages,” as they suffered no military fatalities during the conflict. This was an impressive feat, given the heavy use of Pals battalions in World War I.
Pals battalions were unique units made up of men who’d enlisted under the promise they’d serve alongside those they knew, as opposed to strangers. This, of course, had devastating effects. Most famously, Accrington, Lancashire sent 700 men overseas to participate in the Battle of the Somme. Within the first 20 minutes of combat, 234 were killed and another 350 were wounded.
Thankful Villages
Tablet inlaid at the parish church in Culpho, Suffolk, England. (Photo Credit: Geography Photos / Universal Images Group / Getty Images)
It’s with instances like these that Thankful Villages take on a whole new meaning. It wasn’t until the 1930s that the term was first used. Writer and journalist Arthur Mee wrote a series of guides, titled TheKing’s England, which detailed information about the various counties in England and included his observations on these Thankful Villages. At the time, he estimated that, out of 16,000 British villages, 32 met the criteria, but was only able to confirm 24. It’s now known this number is much higher.
Of one village, he wrote, “Thirty men went from Catwick to the Great War and thirty came back, though one left an arm behind.” In another – Arkholme, Lancashire – 59 went to war and every single one returned. Knowlton, Kent also stands out, being declared the winner of a contest set by the Weekly Dispatch to find which town had sent the most men to fight – 12 out of 39 community members, all of whom returned.
“Doubly thankful”
Church in Middleton on the Hill, Herefordshire, one of the few villages to be “doubly thankful,” 2007. (Photo Credit: Trevor Rickard / Middleton on the Hill Church / Wikimedia Commons CC BY-SA 2.0)
Of the Thankful Villages throughout the UK, there are a number considered to be “doubly thankful.” This name was given to the towns that not only had all of their WWI personnel return, but also all those deployed during WWII. Of the confirmed villages, there’s believed to be only 17 that didn’t lose men in either war. One of these was Catwick, which had 30 men fight and return home.
Thankful Villages have been identified throughout England and Wales, but none have been located in Ireland or Scotland, despite research being conducted there. Of the three Welsh towns, only Llanfihangel-y-Creuddyn and Herbrandston suffered no fatalities in WWII, as well.
Thankful Villages outside of the United Kingdom
Church in Thierville, Normandy, France, 2017. (Photo Credit: Gérard / Wikimedia Commons CC BY-SA 4.0)
While Thankful Villages are predominantly a concept created in the UK, there’s one exceptional case in France that deserves to be mentioned. The fighting there during WWI was bloody and brutal, with 71 percent of those having fought in the conflict either dying or suffering various injuries; 4.3 percent of the country’s entire population perished.
The small village of Thierville, in Normandy, fared much better than the rest and is the only one in all of France to suffer no losses during the conflict. Even more, it also suffered no losses in the Franco-Prussian War, the First Indochina War, the Algerian War and WWII. Every single military member returned home, a claim few towns can make.
There were countless stories of intense bravery to come out of the First World War. However, John “Barney” Hines had a much different approach to how he dealt with the Germans. A soldier with the Australian Imperial Force (AIF), he used his propensity for sticky fingers to steal copious amounts of enemy goods, becoming something of a celebrity in the process.
John Hine’s early life
Australian infantrymen moving up the line past camouflaged tanks during the Battle of Polygon Wood, September 1917. (Photo Credit: John Warwick Brooke / Imperial War Museums / Wikimedia Commons / Public Domain)
John Hines was born Johannes Heim on October 11, 1878 in Liverpool, England. His parents were German immigrants who’d move to the United Kingdom to find work. Hines married Hannah Maher in 1899, having two children with her. Crew lists from this period indicate he spent a significant amount of time at sea, traveling between Liverpool and North America.
Sometime between 1903-06, Hines left his wife and traveled to New Zealand. Between the time he moved there and his obtaining passage to Australia in 1915, he racked up a number of criminal charges, including vagrancy, threatening behaviour, assault and theft.
John Hines enlists in the Australian Imperial Force (AIF)
John Hines surrounded by German equipment he looted during the Battle of Polygon Wood, September 1917. (Photo Credit: Frank Hurley / Australian War Memorial / Wikimedia Commons / Public Domain)
Perhaps to get away from his criminal charges, John Hines traveledto Australia, arriving in Sydney on August 18, 1915. He tried enlisting in the Australian Imperial Force soon after, initially lying about his age and claiming to be 28 years old. However, he was deemed medically unfit for service and subsequently discharged.
Hines successfully re-enlisted in the AIF in May 1916, as the medical requirements had been loosened. He was assigned to the 45th Battalion, which departed for Europe on August 22, 1916. They didn’t see the Western Front until March 1917.
‘Souvenir King’
Manipulated photograph consisting of several photographs taken during the Battle of Polygon Wood. (Photo Credit: Frank Hurley / State Library of New South Wales / Wikimedia Commons CC BY-SA 3.0 AU)
While serving, John Hines gained a reputation as both a devoted and troublesome soldier. When in battle, he was considered extremely effective. His commander, Arthur Samuel Allen, described him as “a tower of strength to the 45th Battalion… While he was in the line.” Off the line, he was described by another as being “two pains in the neck,” as he frequently went missing without leave, forged entries in his pay book and had charges laid against him for drunkenness.
By all accounts, Hines existed as reckless, yet gallant; aggressive, yet kind. This behavior earned him the nickname, “Wild Eyes.” The same man who took 63 German prisoners of war (POWs) by jumping into their pillbox was the one who always ensured the dead were buried at the end of combat. He was the one who carried two bags of Mills bombs into combat, while also taking the time to gently escort wounded soldiers back to safety.
Hines also earned quite a reputation for pillaging items whenever possible. This is where his second nickname, the “Souvenir King,” arose. As well as smaller items, it’s also reported that he stole a piano and grandfather clock, both of which he brought into the trenches. The clock didn’t last long, however, as its chime brought on a hail of shells from the Germans.
Battle of Polygon Wood
Frank Hurley took the now-famous photograph of John Hines during the First World War. (Photo Credit: Hulton-Deutsch Collection / CORBIS / Getty Images)
John Hines was injured during the Battle of Messines in June 1917, but was soon back on the frontlines for the Battle of Polygon Wood, where he truly earned his fame. It was an Australian component of the Third Battle of Ypres, which saw them advance with artillery toward the German lines.
Following the battle, war photographer Frank Hurley took a photo of Hines sitting with the loot he’d procured. He was wearing a German cap, one of his finds, but found much more: 4,000 francs, whiskey, various pieces of jewelry, one million marks, watches and enough “Iron Crosses to fill a sandbag.”
This image was published in numerous newspapers and became one of the most famous Australian photos of the First World War. It was released under the name, “The Wild Eye Souvenir King.” It was also allegedly published in Germany, enraging the Kaiser so much that he put a bounty of 100,000 marks on Hines’ head, an exorbitant amount at the time.
John Hines returns home
Australian soldiers leaving to fight, December 1914. (Photo Credit: Topical Press Agency / Getty Images)
It was during the spring of 1918, when John Hines was fighting in the Battles of Dernancourt, that the soldier fell victim to a gas attack. He was sent for medical treatment at the rear of the front, but the facility was attacked by German aircraft. Hines suffered further injuries when a piece of shrapnel got lodged in his heel, but that didn’t stop him from putting together a makeshift crutch and helping staff move patients to safety.
Hines never recovered enough to return to service and was discharged. Some sources indicate his discharge was due to injury, while others state the official reason was hemorrhoids. Nonetheless, he returned to Australia in 1919, having been credited with killing more Germans during the war than any other Australian soldier.
John Hines’ life following World War I
John Hines, April 1950. (Photo Credit: Unknown Author / Truth Newspaper / Wikimedia Commons / Public Domain)
Despite the fame his souvenir-ing brought him and the admiration he received, John Hines lived in poverty upon his return to Australia. He resided in a tent-style dwelling with a small garden surrounded by a fence, from which captured German helmets hung. Much of his income came from selling the souvenirs he found.
Hines was known for taking vegetables from his garden to the local veterans’ hospital every week, despite having so little himself. Public interest in him was renewed at various points throughout the years when the famous photo of him was displayed at the Australian War Memorial.
Hines never really stopped waiting for another war to come. When the Second World War began, he attempted to enlist, but was rejected, likely due to his age. Some reports state he even tried to smuggle himself to the front on a troop ship, but was found and removed before it left port.
John Hines died on January 28, 1958 at Concord Repatriation Hospital. He was 79 years old.
Prior to the Second World War, Jewish soldiers actively fought in the German Army. This included World War I and a number of conflicts fought by the Prussians throughout the 19th century. The following is a look at what happened to these veterans during World War II, and how their prior military service didn’t always protect them from the Führer’s anti-semitic beliefs and policies.
Service of Jewish German soldiers prior to the World Wars
Willi Ermann, a Jewish German soldier who served in World War I. He later lost his life at Auschwitz during the Second World War. (Photo Credit: Wikimedia Commons / Public Domain)
Prior to the World Wars, Jewish soldiers served in the Prussian Army in a number of conflicts, the first of which was the German Campaign of 1813 – better known as the Wars of Liberation. Up against French leader Napoleon Bonaparte, the year-long war put an end to the overarching power of the First French Empire.
This victory was followed by service in the Prussian Army during the Second Schleswig War (1864), the Austro-Prussian War (1866) and the Franco-Prussian War (1870-71). The latter led to the establishment of the German Empire, under which the Jewish soldiers who’d served were not afforded equal rights. They were barred from officer and government ranks, with the only exceptions being in the likes of the Kingdom of Bavaria and Hamburg.
Between 1880 and 1910, it’s estimated that 30,000 Jewish German soldiers served in the Prussian Army, the highest-ranking of which was Meno Burg, who’d achieved the rank of Judenmajor (Jew major).
Jewish German Soldiers distinguish themselves during World War I
Jewish soldiers during a Hanukkah celebration in Poland, 1916. (Photo Credit: Unknown Author / Wikimedia Commons / Public Domain)
The outbreak of the First World War signaled to Jewish German soldiers the opportunity to be treated equal to the country’s non-Jews. They also felt the fighting on the Eastern Front would allow them to liberate Eastern European Jews from the persecution they faced.
At the start of the conflict, some 12,000 Jewish soldiers volunteered to serve with the Imperial German Army, a number that ballooned to 100,000 by the end of the war. Of that, 70,000 fought on the frontlines, with 3,000 being promoted to officer ranks, which they were only allowed to hold in the reserves. It’s estimated 12,000 German Jewish soldiers were killed in action (KIA).
In October 1916, the anti-semitic Judenzählung measures were implemented, alleging the country’s Jewish population was trying to avoid military service. This upset those who’d enlisted, of whom many were distinguished. This included Wilhelm Frankl, a Pour le Mérite recipient credited with 20 aerial victories, and Fritz Beckhardt, an air ace who scored 17 kills. The Luftwaffe erased the latter from the history books, to support their argument that Jews are cowards.
A recipient of the Iron Cross Second and First Class, as well as the Royal House Order of Hohenzollern, Beckhardt was twice congratulated by German Emperor Wilhelm II for his success in the air. Accused of having relations with a non-Jewish woman during the interwar period, he served an over-year-long imprisonment at Buchenwald. Upon his release, he and his wife escaped to Portugal, before settling in the United Kingdom.
Rise of the NSDAP during the interwar period
Jewish soldiers during a service for Yom Kippur in Belgium, 1915. (Photo Credit: History & Art Images / Getty Images)
Following the conclusion of World War I, many Jewish German soldiers believed their service had proved their patriotism. Many were held in high-regard and accepted as members of veterans’ organizations, including the Reichsbund jüdischer Frontsoldaten (Reich Federation of Jewish Front-Line Soldiers), dedicated to promoting the sacrifices made by German Jews during the war.
Following the rise of the National Socialist German Workers’ Party (NSDAP) in 1933, Jewish veterans were protected against certain measures, as German President Paul von Hindenburg had intervened on their behalf. This changed, however, following his death in 1935.
Following the events of Kristallnacht three years later, Jewish veterans were told by a number of organizations to emigrate from Germany, prompting nearly 40,000 to do so. Those who remained had to contend with the NSDAP’s attempts to erase the efforts of Jewish German soldiers during WWI, so they could be treated like any other Jewish citizen.
The anti-semitic policies put in place by the NSDAP were largely supported due to what became known as the “stab-in-the-back myth,” which stated that Germany hadn’t lost WWI on the battlefield, but, rather, because of certain citizen groups on the home front. This included Jews, socialists and Republican politicians.
Crackdown of Jewish German soldiers during World War II
Jewish German soldiers during an outdoor service for Yom Kippur, World War I. (Photo Credit: Center for Jewish History, NYC / Wikimedia Commons / No Restrictions)
Upon the outbreak of World War II, Jewish veterans believed their service in the military would protect them against increased crackdowns across the country. However, in 1940, a law was passed, which stated Jews and those with two Jewish grandparents were to be kicked out of the armed forces.
That’s not to say Jewish soldiers didn’t fight in the German Army during the conflict. Some were drafted, while others willingly served in honor of their fathers who’d enlisted during WWI. Many of these men felt the Nuremberg Laws didn’t apply to them, and some went so far as to falsify their papers, so they could serve. There were even a handful of soldiers who believed their service would spare the lives of their family members, which proved to not be the case.
In 1942, Theresienstadt was established to house Jewish veterans, allowing the German Army to remove them from society. As Bryan Riggs told the Los Angeles Times, “When the transports came to pick them up for deportation, they came out in uniforms with their medals.”
There were also times when the Führer himself made exceptions to let Jewish German soldiers serve. In a personnel document dating back to 1944, 77 high-ranking officers “of mixed Jewish race or married to a Jew” were declared to be of German blood. While the country’s leader despised Germany’s Jewish population, he realized he needed experienced military men to serve as soldiers and commanders.
Hugo Gutmann
Hugo Gutmann, 1918. (Photo Credit: Bavarian War Ministry / Bavarian State Archive / Wikimedia Commons / Public Domain)
Hugo Gutmann was a Jewish military officer who served in the Bavarian Army during the First World War. He was transferred to the reserves in 1904 and recalled when the conflict broke out, eventually rising to the rank of lieutenant. Gutmann was also appointed as a company commander and acting adjutant for the “List” Regiment’s artillery battalion. He was a highly decorated soldier, having been presented with the Iron Cross Second and First Class in 1914 and ’15, respectively.
While in this role, Gutmann served as the future Führer’s direct superior, going so far as to recommend him for the Iron Cross First Class, which he received in August 1918. Following WWI, he was demobilized from the military and served as a reserve lieutenant. However, in 1935, under the recently-passed Nuremberg Laws, the soldier lost his German citizenship and veteran roles in the Army, due to his Jewish faith.
A few years later, Gutmann was arrested by the Gestapo, but released after the SS learned of his military background. He and his family subsequently left Germany and emigrated to Belgium, before moving to the United States prior to the German invasion of the Low Countries. He lived in the US until his death in June 1962, working as a typewriter salesman.
Berthold Guthmann
Berthold Guthmann with his sister, Anna, and brother, Eduard. (Photo Credit: Unknown Author / Wikimedia Commons / Public Domain)
Berthold Guthmann was a Jewish soldier who volunteered to serve as part of the Imperial German Army at the outbreak of WWI, along with his two brothers. He subsequently joined Schutzstaffel 3 of the Luftstreitkräfte (Imperial German Air Service) as a gunner and observer, and was awarded the Iron Cross Second Class for his actions in combat.
Following the war, Guthmann became an attorney in a large Jewish community. In 1938, shortly after the events of Kristallnacht, he was arrested and sent to Buchenwald for a brief period of time. When the Jews living in Wiesbaden, Hesse were deported to Theresienstadt, his was one of three families initially spared. However, they were deported in late 1942, with Guthmann being executed at Auschwitz almost immediately after his arrival.
While his son, Paul, was killed at Mauthausen, Guthmann’s wife and daughter survived, with the latter emigrating to the US after the end of WWII. The WWI veteran was not the only one to have lost his life in a concentration camp, with others being Siegfried Klein and Martin Salomonski.
Leo Baeck
Leo Baeck, 1951. (Photo Credit: ullstein bild / Getty Images)
Serving as a chaplain in the Imperial German Army during the First World War, Leo Baeck was a proponent for the Jewish people and their faith. When the NSDAP came into power in 1933, he became president of the Reichsvertretung der Deutschen Juden (Reich Representation of German Jews), which became the government-controlled Reichsvereinigung (Reich Association of Jews in Germany) following Kristallnacht.
In January 1943, Baeck was deported to Theresienstadt, despite attempts by a number of American institutions to help him escape Germany. The rabbi refused all offers, not wanting to abandoned his community. At the camp, he became the “honorary head” of the Council of Elders, which afforded him protection from transports, as well as more frequent mail deliveries and better food and accommodations.
Baeck survived his imprisonment and moved to the UK, where he served as the chairman of the World Union for Progressive Judaism and the first international president of the Leo Baeck Institute. He passed away on November 2, 1956.
While the majority know Bela Lugosi for his portrayal of Count Dracula in the 1931 film adaptation of Bram Stoker‘s novel, few are aware of his service with the Austro-Hungarian Army during the First World War. The famed actor spoke little of this time in his life, but did reveal a few tidbits to his co-stars over the years.
Bela Lugosi’s early life and stage debut
Bela Lugosi, 1900. (Photo Credit: Unknown Author / Retronaut.com / Wikimedia Commons / Public Domain)
Bela Lugosi was born Béla Ferenc Dezső Blaskó on October 20, 1882 in Lugo, Hungary. When he was 12 years old, he dropped out of school, ran away from home and took on a number of manual labor jobs, before beginning his stage acting career in 1902. His earliest known roles were in provincial theaters during the 1903-04 season.
In 1911, Lugosi moved to Budapest, where he appeared in productions with the National Theatre of Hungary. Between 1913-19, he had an illustrious acting career, putting on an estimated 172 stage performances.
Bela Lugosi’s service with the Austro-Hungarian Army
While he rarely discussed this time in his life, Bela Lugosi actively served during the First World War, volunteering with the 43rd Royal Hungarian Infantry Regiment in 1914 as a ski patrolman. As a member of the Austro-Hungarian Army, he was sent to the Eastern Front, where he and his comrades were constantly locked in skirmishes with the Russians.
Among the most disastrous engagements for the Austro-Hungarian Army was the Carpathian Winter Campaign of 1915. This stemmed from fighting that had occurred between the Russians and Germans during the Battle of Tannenburg, after which the former moved into the border region of Austria-Hungary. During fighting at Rohatyn, in what’s now western Ukraine, Lugosi suffered his first injury.
Following his recovery, he joined the effort to drive the Russians out of the southern passes of the Carpathians. While this would ultimately end in a stalemate between the two sides, it was costly for the Austro-Hungarians. In what has been described as “the largest barrage yet attempted on the Eastern Front,” German guns and those of other Central Powers fired an estimated 750,000 shells onto Russian positions.
Lugosi was, again, injured during this time and received the Wound Medal. The following year, he was discharged for “mental collapse,” putting an end to his 16-month service. During the rare times in which he spoke about the Great War, he revealed he’d been a “hangman” for the Austro-Hungarian Army, and that killing left him both “thrilled” and “guilty.”
Fleeing Hungary following the revolution
Bela Lugosi, 1931. (Photo Credit: John Springer Collection / CORBIS / Getty Images)
Following World War I, Bela Lugosi became involved in a radical actors guild, which called for the nationalization of theater in Hungary and an end to the system that gave actors roles based on seniority. When the Hungarian Soviet Republic under Béla Kun collapsed in 1919, his activism left him vulnerable to imprisonment and execution, prompting him and his first wife to flee to Vienna, after which they settled in Berlin.
While in Weimar-era Germany, Lugosi starred in a number of silent films. In December 1920, he found a job aboard a merchant ship bound for New Orleans, Louisiana and made his way to New York City. He was admitted into the United States through Ellis Island in 1921, after which he formed a small stock company with fellow Hungarian actors, which toured the East Coast and put on plays for fellow immigrants.
Lugosi’s first English-language Broadway play was 1922’s The Red Poppy, with his debut American film role occurring the following year with The Silent Command. While four other silent film roles followed, what really gave the Hungarian his big break was the touring stage production of Dracula. He performed the play over 1,000 times during his lifetime, and it was during its stint on the West Coast that he opted to move to California to pursue his Hollywood career.
Despite the praise he received from critics for his stage portrayal of Count Dracula, Bela Lugosi wasn’t Universal Pictures’ first choice when the decision was made to turn the book into a film. Instead, the likes of Paul Muni, John Wray and Chester Morris were considered.
Lew Ayres was the first person hired to take on the role, but was replaced by Robert Ames after he was cast in a different movie. Ames was subsequently replaced by David Manners, who later took on the role of Jonathan Harker. It was only then that Lugosi was tapped by director Todd Browning.
While Dracula became a resounding success, Lugosi only received a salary of $3,500 – equivalent to around $68,600 today. Following the film’s release, the actor also found himself being typecast as a villain, appearing in Murders in the Rue Morgue (1932), The Black Cat (1934) and The Raven (1935). It reached a point where either Lugosi or his agent wrote in the 1937 Players Directory that the idea he could only perform horror roles was “an error.”
Bela Lugosi’s declining acting career
The Black Cat, 1934. (Photo Credit: SpinnersLibrarian / MovieStillsDB)
In the mid-1930s, Bela Lugosi suffered a dip in his career, with a much-needed popularity boost coming with the double feature of Dracula and Frankenstein (1931) at a California theater. This led Universal Pictures to re-release both nationally and hire Lugosi for a number of new films, including 1939’s Son of Frankenstein.
In total, Lugosi would star in 18 movies for the movie studio.
Following this string of films, however, Lugosi’s career, again, began to decline. This was largely the result of his dependence on morphine and methadone. These had been prescribed to him to treat chronic sciatica, which was the result of the injuries he’d suffered during WWI. After being approached by filmmaker Ed Wood while on the brink of poverty, Lugosi checked himself into a treatment program, in the hopes of combating his addiction.
Following his discharge, Lugosi starred in one more film, The Black Sleep. It was released in the summer of 1956 via United Artists. Sadly, the actor was never able to see the completed feature, on account of his untimely death.
Death and legacy
Bela Lugosi’s grave at Holy Cross Cemetery in Culver City, California. (Photo Credit: IllaZilla / Wikimedia Commons CC BY-SA 3.0)
On August 16, 1956, Bela Lugosi passed away of a heart attack at his Los Angeles apartment. His body was found by his wife, with the medical examiner concluding the 73-year-old had passed away peacefully in his sleep. While a rumor spread that he’d been clutching the script for an upcoming Ed Wood film, this was later proven to be untrue.
Lugosi was buried at Holy Cross Cemetery in Culver City, California. According to his son, the actor was buried in full costume, wearing a cape and his Dracula ring. While it was believed he’d personally requested this be done, Bela Lugosi Jr. has said on multiple occasions that he and his mother, Lillian, made the decision themselves, adding that it’s likely what his father would have wanted.
Over half a century after his death, Bela Lugosi’s legacy continues to live on. He has received a star on the Hollywood Walk of Fame, and his portrayal of Count Dracula continues to be the one most associated with the fictional character.
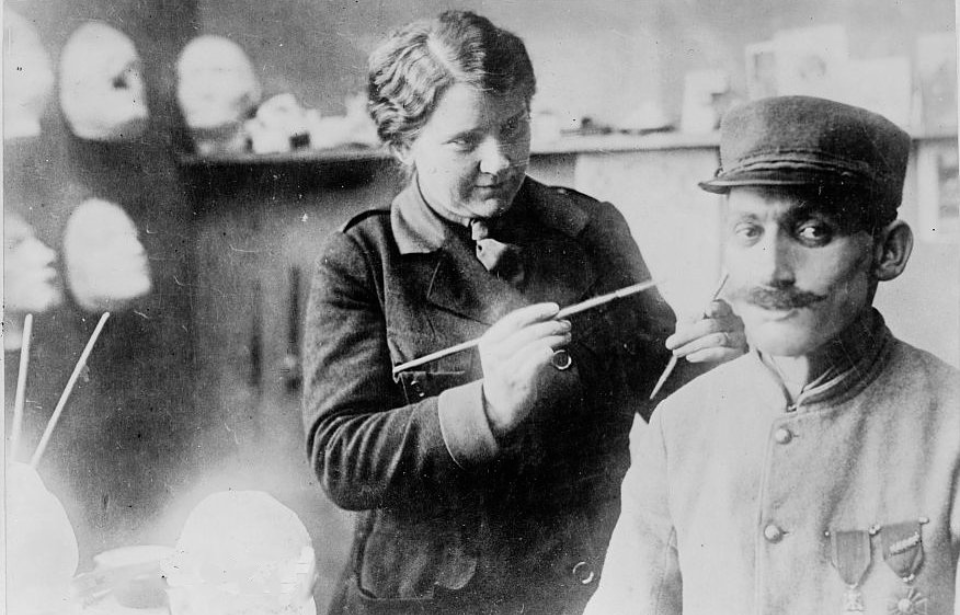
Throughout World War I, women took on a whole host of new roles to contribute to the war effort, including nursing, firefighting and engineering. Unlike many others, Anna Coleman Ladd didn’t work in a traditional field. Rather, she used her penchant for sculpting to create custom masks for soldiers who’d suffered facial deformities as a result of injuries sustained in combat.
Anna Coleman Ladd’s work as a sculptor
Anna Coleman Ladd, 1901. (Photo Credit: Archives of American Art / Wikimedia Commons / Public Domain)
Anna Coleman Ladd, née Watts, was born in Pennsylvania on July 15, 1878. She was educated overseas, studying sculpting in Rome and Paris, before moving back Stateside to study at the Boston Museum School. She eventually married Dr. Maynard Ladd in England, after which the pair moved to Boston. One of her pieces, Triton Babies, is featured in a fountain at the Boston Public Garden.
In 1914, Coleman Ladd joined the Guild of Boston Artists as a founding member, with whom she exhibited much of her work. Her career continued until 1936, when she retired to California with her husband, dying only three years later.
While she gained fame for her museum-quality work, it was her efforts during and after the First World War that she’s best known for, not only creating masks for soldiers with facial deformities, but refining and improving the art behind the skill.
Combat and the resulting facial deformities
Facial masks created by Anna Coleman Ladd, 1918. (Photo Credit: Library of Congress / Wikimedia Commons / Public Domain)
The advancements in military technology during WWI were useful, as they allowed for more aggressive and effective combat. On the other hand, these weapons led to horrific injuries that were difficult to recover from. As explained by a doctor who’d served on the front, “Every fracture in this war is a huge open wound with a not merely broken but shattered bone at the bottom of it.”
This assessment can also be applied to the human face. Fred Houdlett Albee, a surgeon during the conflict, wrote, “It is a fairly common experience for the maladjusted person to feel like a stranger to his world. It must be unmitigated hell to feel like a stranger to yourself.” For context, severe facial disfigurement was one of few injuries for which veterans earned a full pension in the United Kingdom, as the men were “condemned to isolation” because of their condition.
Of the injuries inflicted during combat, facial disfigurement was generally considered to be the most traumatic, due to how alienating it could be for the victim. Although medical care was advanced enough to make such wounds survivable, many were unable to drink, eat or speak after undergoing reconstructive surgery.
Mastering the technique
Anna Coleman Ladd with a soldier wearing one of her masks, 1918. (Photo Credit: Library of Congress / Wikimedia Commons / Public Domain)
In 1917, Anna Coleman Ladd discovered the work of Londoner Francis Wood, who was making masks for wounded soldiers. After approaching him, the two began working to improving his technique. Wanting to continue this work, she obtained permission to go overseas and work with the American Red Cross, eventually opening the Studio for Portrait Masks.
It was important to Coleman Ladd that the space was welcoming for soldiers, so she designed it to include flowers, posters, and both the French and American flags.
The sculptor worked alongside four assistants to make life-like masks for injured servicemen. She was exceptional at her craft, taking plaster casts of the men’s faces, so she could accurately replicate the facial features from their “good” side. The mask would then be made from copper and painted to match the color of the soldier’s skin – natural hair was even used to create eyelashes, mustaches and eyebrows. From start to finish, it took a month to complete the finished product.
The masks were usually held to the face by glasses or string. It reached a point where Coleman Ladd was so good at creating them that she was able to do so by simply looking at photos of the servicemen prior to them suffering their injuries. This set her studio apart from Wood, and she was generally credited with producing finer work.
Anna Coleman Ladd changed many lives
French soldier fitted with one of Anna Coleman Ladd’s masks, 1918. (Photo Credit: Library of Congress / Wikimedia Commons / Public Domain)
It’s recorded that roughly 3,000 French soldiers received corrective masks, of which Anna Coleman Ladd made 185. For her work, she was awarded the Croix de Chevalier de l’Ordre de la Légion d’Honneur and the Serbian Order of Saint Sava. Although she made many masks, none survived into the present day – they either fell apart due to use or their wearers were buried with them.
The masks Coleman Ladd created undoubtedly changed many soldiers’ lives. Aside from her awards, the sculptor received many letters from clients, who praised her work and thanked her for what she did for them.
One serviceman expressed his thankfulness that his wife no longer found him repulsive, while another wrote, “My gratitude to you will last forever and I will never forget for I wear and will always wear the wonderful fittings which you came up with and it is thanks to you that I can survive being under fire. It’s thanks to you that I am not buried deep in an old veterans’ hospital.”
When the First World War began in 1914, it quickly became apparent that newer, more advanced weapons were needed. This was particularly true on the frontlines, where infantrymen had to contend with not only mazes of trenches, but fortified bunkers and machine gun nests. In response, the French Army developed the 37 mm M1916. While it was intended to excel on the Western Front, the opposite proved to be true, causing it to become all but obsolete by the middle of World War II.
Developing a potent infantry weapon
Military personnel manning a 37 mm M1916 fitted with a telescopic sight at the Army Specialists School, Langres, northeastern France, 1918. (Photo Credit: American Official Photographer / Imperial War Museums / Wikimedia Commons / Public Domain)
The 37 mm M1916, officially known as the Canon d’Infanterie de 37 modèle 1916 TRP, was developed by the French Army in 1915, with the intention of providing infantrymen with an effective weapon that could both disrupt enemy action and clear the path for the advancing line. Additionally, the service wanted to provide a tool that could knock out enemy positions, such as barbed wire fences and enemy machine gun nests.
Atelier de Construction de Puteaux (APX) was tasked with designing and manufacturing the weapon, producing 4,000. Along with use on the frontlines, it was also tested aboard aircraft, including the British Beardmore W.B.V. single-engine shipborne biplane fighter prototype and the French Salmson-Moineau S.M.1 A3 three-seat biplane long range reconnaissance aircraft. It was quickly removed from the former after it was proven to be too dangerous an addition.
37 mm M1916 specs
37 mm M1916 on display at the Brussels Army Museum, Belgium. (Photo Credit: Megapixie / Wikimedia Commons / Public Domain)
The 37 mm M1916 was a 104-pound gun and recoil mechanism mounted upon an 84-pound carriage. With the addition of wheels, it could be broken down and carried by four soldiers, two of whom served as its gun crew, taking the roles of aimer and loader.
The infantry weapon was designed to fire the smallest caliber allowed for explosive shells under the 1899 Hague Convention. It used the 37 x 94 mm Obus explosif Mle1916 high-explosive (HE) round, which featured a 1.22-pound projectile and a bursting charge weighing 0.66 pounds. Through its rotating breech-block and hydraulic recoil absorption system, the 37 mm M1916 could produce a rate of fire of between 25 and 35 RPM, with a minimum range of 1,500 meters and a maximum of 2,400 meters.
Also equipped by the American Expeditionary Forces (AEF), the US version was assigned an ammunition limber. It fired the Mk II HE shell with a 1.5-pound projectile and a 0.59-pound TNT bursting charge.
Use on the frontlines during World War I
37 mm M1916 firing position along a second-line trench in Dieffmatten, Germany, 1918. (Photo Credit: Cpl. Allen H. Hanson / Defense Imagery / United States Armed Forces / Wikimedia Commons / Public Domain)
Over the course of its service history, the 37 mm M1916 was used by forces from the United States, the United Kingdom, the Philippines, Belgium, France, Poland, Italy and North Vietnam, the latter of which equipping it during the First Indochina War. However, the weapon saw much of its action on the Western Front during the First World War.
In May 1918, the French deployed the Renault FT-17 to the frontlines. The world’s first modern tank, it could travel at 5 MPH while providing much-needed mobile fire support for troops fighting the Germans during the war’s final Allied offensive. Around half of the FT-17s that saw action were equipped with the 37 mm M1916, while the other 50 percent saw their firepower come from 8 mm Hotchkiss M1914 machine guns.
It’s also noted that famed French fighter ace René Fonck‘s SPAD S.XII was equipped with a 37 mm M1916. The pilot, known as the “all-time Allied Ace of Aces” and the top Entente fighter ace of World War I, is credited with 75 confirmed victories – 72 solo and three shared – with a total of 142 claimed.
The 37 mm M1916 saw extensive use with the AEF fighting in Europe. Outside of the country’s infantry, it was also equipped by the country’s license-built near-copy of the FT-17. However, the tanks were completed too late to enter service during the war and, as such, none saw action.
Issues with the 37 mm M1916 on the Western Front
French Army soldiers firing a 37 mm M1916 at the shooting range in Sains-en-Amiénois, northern France, 1916. (Photo Credit: Amédée Eywinger / Imperial War Museums / Wikimedia Commons / Public Domain)
While it was developed for use on the Western Front, the 37 mm M1916 actually proved to be a hindrance. At 104 pounds, it was difficult to transport across the muddy conditions of No Man’s Land, and its large size meant it was difficult to transport across the trenches that lined the frontlines. The weapon’s weight also meant its operators were often unable to keep up with the fast-paced nature of the conflict.
On top of this, the 37 mm M1916 wasn’t the best at performing the task it was designed for: destroying enemy machine gun emplacements. Mortars proved to be far more effective. This, paired with their lighter weight, made them the preferred choice.
Superseded by more effective weapons during World War II
US military personnel training with a 37 mm gun M3 at Camp Carson, Colorado, 1943. (Photo Credit: Franklin D. Roosevelt Library / U.S. National Archives and Records Administration / Wikimedia Commons / Public Domain)
During the interwar period, the US Army created infantry regiments with howitzer companies, which were armed with a host of support weapons, including the 37 mm M1916. However, only the National Guard could afford to maintain them, with the Army having to settle for platoons, which trained using a cost-effective .22-caliber sub-caliber device. These units were disbanded in 1941 and replaced by anti-tank platoons, with the majority of the 37 mm M1916s either being scrapped or placed in storage.
When the US joined the Second World War following the Japanese attack on Pearl Harbor, the 37 mm M1916 had largely been replaced by the more effective 37 mm gun M3, the first anti-tank gun fielded by the country’s forces in numbers. The Americans fighting in the Philippines Campaign in 1941-42 did occasionally man the WWI-era weapon, but only because they were running low on available M3s.
The French Army was still equipped with the 37 mm M1916 at the start of the conflict, but, by 1940, it had been replaced by the 25 mm Hotchkiss anti-tank gun. Similar to the US forces, they occasionally had to return to the bulkier canon when the latter was in short supply. When the Germans occupied the country following the Battle of France, they captured a number of 37 mm M1916s, which they operated under the designation 3.7 cm IG 152(f).
Type 11 37 mm infantry support gun
Type 11 37 mm infantry support gun operated by the Imperial Japanese Army (IJA), 1930s. (Photo Credit: Unknown – Possibly Japanese Military Photographer / Glorious Army Picture Book / Wikimedia Commons / Public Domain)
Following WWI, the Imperial Japanese Army (IJA) purchased a production license to manufacture their own variant of the 37 mm M1916. Dubbed the Type 11, it provided infantry support for troops fighting in the Second Sino-Japanese War and WWII.
Production of the Type 11 occurred between 1922-37, with the weapon itself being equipped from 1922-45. It required a crew of 10 to operate – four gunners and six support personnel – and fired both the powerful Type 12 HE and a rather ineffective anti-tank shell. Along with being carried onto the front by soldiers for use against enemy machine gun positions, the Type 11 was equipped by the Japanese Renault NC27 and Type 89 I-Go medium tanks.
During the early years of the Second Sino-Japanese War, the Type 11 was considered an effective infantry weapon against enemy pillboxes, lightly-armored vehicles and machine gun nests. However, it failed to hold the same prestige during the Second World War, due to its low muzzle velocity and rate of fire, and it was largely replaced by the Type 94 37 mm anti-tank gun. Only reserve units found themselves equipped with the Type 11.
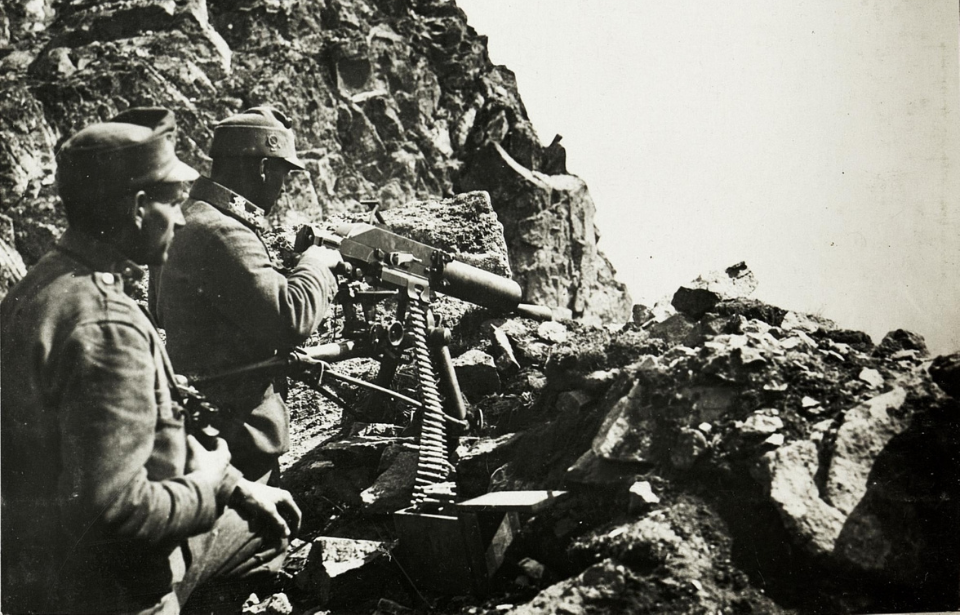
A number of machine guns saw action during the First World War. While the Vickers, Maxim and Lewis guns are likely the ones that come to mind, there’s another that stands out simply because of how unusual its design was: the Schwarzlose MG. Developed for the Austro-Hungarian Army, this machine gun not only saw use by infantrymen, but was adapted to feature aboard ships and on aircraft, and was even installed in military fortifications.
Development of the Schwarzlose MG
Schwarzlose MG being manned by soldiers stationed in the Ukrainian People’s Republic, 1918. (Photo Credit: FORTEPAN / Urbán Tamás / Wikimedia Commons CC BY-SA 3.0)
The Schwarzlose MG, also known as the Maschinengewehr M, was designed in 1904 by Prussian firearms designer Andreas Wilhelm Schwarzlose, who rose to fame for developing a blowback-operated machine gun. The weapon entered production in 1905 as the M1905, and was steadily improved upon as the years went on.
The Schwarzlose used by soldiers during World War I entered production in 1908 and was manufactured by Steyr Arms and Fegyver-és-Gépgyár (FÉG) for a decade. In 1918, active sales of the weapon ended with the close of the conflict.
Schwarzlose MG specs
Schwarzlose MG on display at a museum. (Photo Credit: OlliFoolish / Wikimedia Commons CC BY-SA 3.0)
The Schwarzlose MG was a belt-fed, water-cooled machine gun that resembled those within the Maxim family. However, it was given a much simpler design and function, meaning it was inexpensive to manufacture, allowing for the necessary quantities to be produced during the First World War.
While resembling the Maxim, the Schwarzlose was unusual in that it employed a delayed blowback mechanism that utilized a single spring, as well as another that incorporated a device that oiled cartridge cases for easier extraction. The former feature allowed the chamber pressure to drop to a safe level, if the machine gun was operated correctly.
Similar to other machine guns, the Schwarzlose was heavy, weighing in at 41.4 kg. That being said, it was sturdy and reliable. It could fire between 400 and 580 RPM, with its 8 x 50 mmR Mannlicher and 8 x 56 mmR ammunition provided by a 250-round cloth belt.
Use as an infantry weapon
Soldiers manning a Schwarzlose MG in a trench, 1916. (Photo Credit: Unknown Author / bildarchivaustria / Wikimedia Commons / Public Domain)
The Schwarzlose MG was developed for use by infantrymen and thus was used heavily throughout the fighting that occurred during the First World War. It served a traditional, tripod-mounted role, with a crew of three typically charged with manning it. One served as the commander, while the others were the gunner and ammunition carrier. The third would also typically act as the loader.
While serving as an infantry weapon, the Schwarzlose could also be deployed with a more-compact “backpack mount,” although it was rarely used in such a way. In this configuration, it was fitted with a backwards folding bipod that was attached to the front of the water jacket, near the muzzle.
Modifying the Schwarzlose MG for aircraft was a challenge
Soldiers operating a Schwarzlose MG in an anti-aircraft capacity, 1915. (Photo Credit: NIMH / Dutch Ministry of Defence / Wikimedia Commons CC0 1.0)
While the Schwarzlose MG was used by infantrymen in an anti-aircraft capacity, it was actually adapted for use by aircraft flown by the Austro-Hungarian k.u.k. Luftfahrtruppe. A lighter version was necessary for this, which was ring-mounted or fixed-wing.
Right away, it was evident the Schwarzlose wasn’t developed for use by aircraft, as synchronizing it proved to be an engineering nightmare, due to the weapon’s delayed blowback mechanism. To bypass this, the fighters were equipped with large tachometers and Kravics indicators, which warned pilots of malfunctions in the synchronization gear. Attached through electrical wiring, they knew something was wrong when the Kravics’ light went out.
When initially equipped by aircraft, the Schwarzlose was largely unmodified, with its flash-hider being the only component that was removed. As WWI continued to rage on, slots were cut into the sheet metal covering the water jacket, allowing for air cooling. This feature was removed altogether in 1916, however, when the machine gun was fitted with a stronger spring and a blowback enhancer that increased its output to 880 RPM.
Additional modifications were made when the machine gun was ring-mounted, with its handles enlarged and a handgun-style trigger added. All ring-mounted Schwarzloses were also equipped with specialized sights and boxes for their ammunition belts, for more effective reloading.
Following the end of the First World War, the Schwarzlose saw limited used as an aircraft gun.
Increasing the defense of military fortifications
Soldiers manning a Schwarzlose MG in the Tyrol Mountains. (Photo Credit: Unknown / Das Ende einer Armee / Fritz Weber / Wikimedia Commons / Public Domain)
Outside of its aforementioned roles, the Schwarzlose MG also saw use as a naval gun aboard sea vessels and a fortress weapon. When equipped for the latter, it could be deployed on a host of different fixed mountings.
While its use as a fortress weapon was limited during WWI, the Czechoslovakians used the Schwarzlose in this capacity during the interwar period. The country’s armed forces adapted the machine gun, tasked the Janeček Factory with production and renamed it the těžký kulomet vz. 7/24.
When Germany began to expand its sphere of power during the mid-1930s, Czechoslovakia dedicated a portion of its military budget to the construction of fortifications, some of which were partially armed with the vz. 7/24.
Issues with the Schwarzlose MG
Soldiers manning a Schwarzlose MG in the field, 1916. (Photo Credit: FORTEPAN / Urbán Tamás / Wikimedia Commons / Public Domain)
While the Schwarzlose MG was effective as an infantry weapon, it did have issues, particularly when used in ways it hadn’t been designed for, such as its aforementioned role as an aircraft gun. Outside of this, its unlocked-breech design required a shorter barrel, which, while helping to alleviate pressure, limited the machine gun’s muzzle velocity and reach. It also created a significant muzzle flash, necessitating the use of a rather large flash suppressor.
Another issue involved the Schwarzlose’s reliance on the weight of its breech block and semi-folded toggle arm. The former would unfold at a severe mechanical disadvantage, thereby slowing down the opening of the former.
Use by other nations
Soldiers manning Schwarzlose MGs in an anti-aircraft capacity, 1916. (Photo Credit: FORTEPAN / Urbán Tamás / Wikimedia Commons / Public Domain)
Outside of the Austro-Hungarian Empire, the Schwarzlose MG saw use by a number of nations, including Greece, the Ottoman Empire, the Netherlands, Imperial Russia and Sweden, to name a few. During the interwar period, the Polish Air Force equipped its aircraft with the machine guns, using them against the Soviets during the Polish-Soviet War, while Japan equipped the 6.5 mm Arisaka variant on its Fusō-class battleships and Kongō-class battlecruisers.
When World War II broke out, the Schwarzlose was the standard-issue machine gun for the Italian colonial forces stationed in North Africa, where it saw limited action as an anti-aircraft weapon. The German Army also used it during the final stages of the conflict, while the Swedish volunteer unit (SFK) equipped it during the Winter War.
Before it became obsolete, the Schwarzlose also saw use during the 1932-33 Colombia-Peru War, the Russian Civil War, the 1948 Arab-Israeli War, the Austro-Slovene Conflict, the Balkan Wars, the Spanish Civil War and the Austrian Civil War.
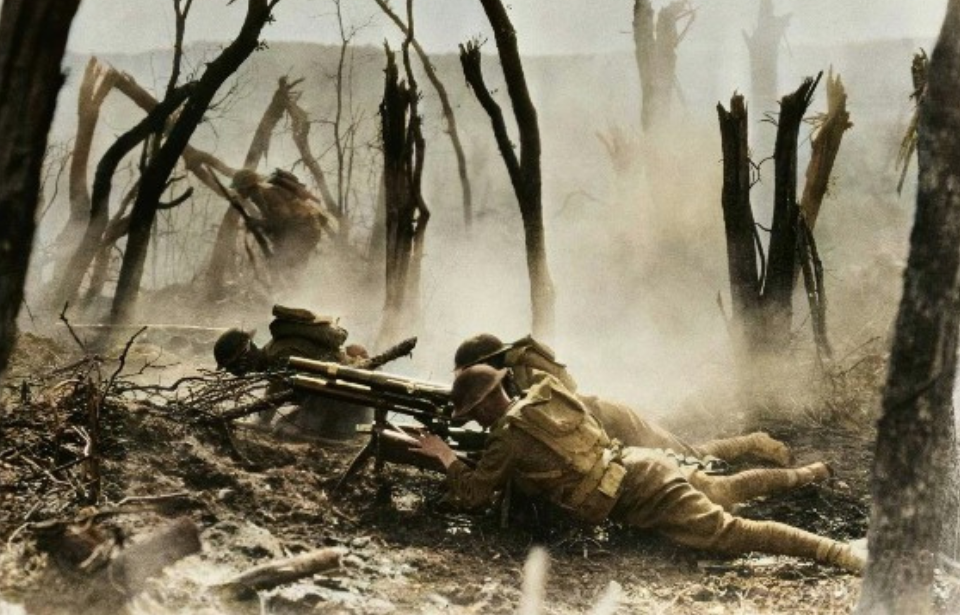
If there’s one thing World War I is known for, it’s the use of trenches as a means of protection and strategy. They could be seen for hundreds of miles along the Western Front, employed by soldiers positioned near the English Channel, all the way to the Swiss Alps. Various types of trenches were employed during WWI, as a way to maximize their value. That being said, they still had their pitfalls.
How trenches changed warfare over the course of WWI
German machine guns along the front near Darkehmen, East Prussia. (Photo Credit: Bettmann / Getty Images)
During WWI, trenches provided shelter for soldiers who engaged in the harsh fighting along the Western Front. They also made it difficult for the opposing forces to advance and attack the frontline. Dug under the cover of darkness, they ran eight feet deep and between four-six feet wide. Wood and/or tree posts were used to reinforce the walls and prevent collapse.
Trenches weren’t frivolously built without careful planning; there was a strategic pattern to them. They were constructed in a zig-zag formation, which allowed for the maximum amount of damage to be inflicted against the enemy, while lessening the number of casualties. Straight lines and uniform walls would have allowed for straight shots, so random turns and angled walls, known as traverses, provided quick shelter against artillery.
Both sides employed the use of trenches during WWI, and, in doing so, transformed warfare. As the conflict progressed, so, too, did the architectural integrity of these trench systems, with the Germans developing elaborate defense positions featuring cement pillboxes and dugouts that could withstand Allied bombardment.
The expanse between each side was dubbed “No Man’s Land,” and it became the area each attempted to gain control of. As such, it was quite dangerous to cross, making the common tactic of launching infantry assaults ahead of artillery attacks particularly deadly. By the end of 1914, for example, the number of dead and injured had exceeded four million.
When the first tanks hit the Western Front toward the end of WWI, it became apparent that trench warfare had met its end, as the tracked vehicles weren’t only able to cross over the muddy expanse of No Man’s Land, they could also drive over trench openings and were invulnerable to most enemy fire.
There were three common methods to digging trenches
15th New York Regiment training for trench warfare, 1910s. (Photo Credit: Underwood Archives / Getty Images)
There were three main methods of trench-building employed during WWI. The first was known as sapping, wherein soldiers dug shallow trenches that extended into No Man’s Land from larger ones. This was the safest way to extend the systems, as shallow areas could be built by one or two soldiers and reinforced as regular trenches were extended from them. In some cases, sapping was used for rescue and retreat purposes.
Tunneling was another common form of trench-building, and it followed a similar system to sapping. Tunnels were constructed underground to provide cover from enemy fire, making them safer than regular trenches, which didn’t have overhead coverings. They were used to protect injured soldiers, and were also employed during night raids on enemy positions. Additionally, the roofs could be collapsed to create regular trenches.
Sandbagging was the third form of trench-building seen during WWI, serving as a deception tactic. While sandbags were effective at providing cover from rifle fire, they did little to protect against artillery. As such, they were stacked and covered in dirt and grass, to camouflage them and give the appearance of being underground. On occasion, they’d also be decorated to look like soldiers, so the enemy would accidentally reveal their location during an attack.
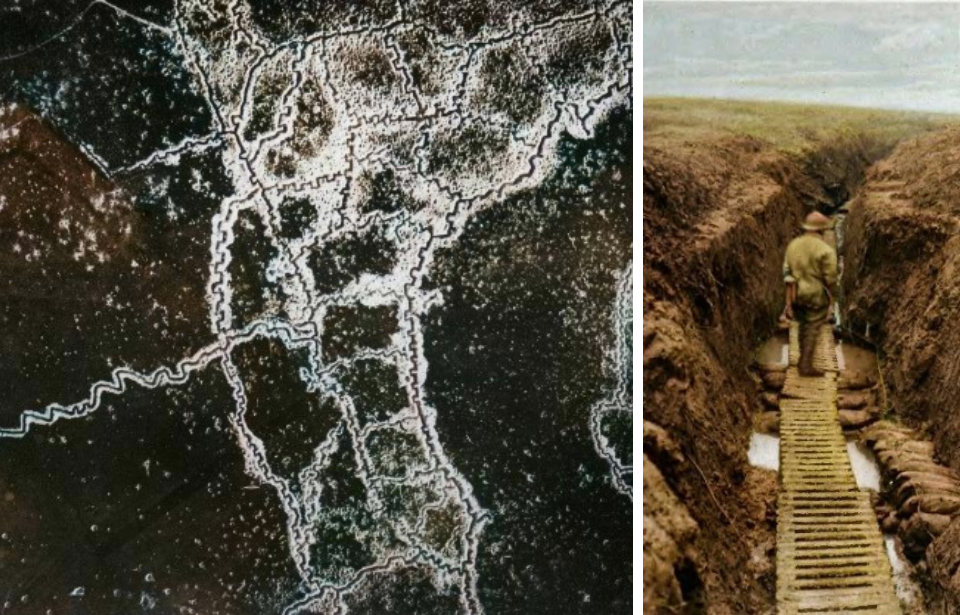
British trenches during WWI
Flooded trench along the Western Front. (Photo Credit: National Library of Scotland / Wikimedia Commons / No Restrictions)
British trenches were divided into four different types. The frontline trench, also known as the outpost line, was the closest to the enemy, located between 50 yards and one mile away. Barbed wire lined the top, providing protection for those manning them, such as sparsely-positioned machine gunners. Soldiers would spend one week in the frontline trench before retreating to the rear, alternating weekly.
The support trench was located several hundred yards away and provided support to the frontline, housing first aid stations and food preparation spots. It also served as a second line of defense, in case of the frontline trench becoming overrun. The reserve trench was even further back and served as an emergency position, should both the frontline and support trenches be taken over by the enemy.
Communication trenches connected the aforementioned types, allowing soldiers to move from the front to the rear and vice versa, sending messages and supplies wherever needed. They also served as paths across which injured soldiers were carried, removing them from immediate danger and providing a better chance of transporting them to nearby field hospitals.
Within these trenches, artillery lines could be found, as well as machine gun nests manned by two or three soldiers. Underground bunkers were also dug along them, as a means to store food, weapons and artillery. They also served as command centers, with telephone lines allowing for the transmission of information and instructions.
Extending closer toward the enemy than the frontline trench was the listening post, where tunneling was employed to create a position that stretched 30 meters under No Man’s Land. From there, soldiers equipped with stethoscopes listened to ground vibrations to determine any movement above.
Death came in many forms in the trenches
German advance through No Man’s Land. (Photo Credit: Buyenlarge / Getty Images)
Despite the immediate protection trenches offered, they were also extremely dangerous – and for multiple reasons. If a trench became overrun by the enemy, soldiers could become trapped and fall victim to direct fire, as they weren’t the easiest spaces to escape from. Although the zig-zag design did reduce the possibility of such an event occurring, those who weren’t quick enough were easily caught by enemy fire.
One of the most deadly issues to stem from trenches during WWI was trench foot. Rain and shallow water tables caused flooding, and if soldiers stood in said water for too long, their feet became waterlogged, swollen and blistered. The disease could become so severe that those afflicted with it would need their foot/feet amputated to prevent the spread of infection – or even death.
To prevent trench foot and flooding, a narrow drainage channel was built into the trenches that lined the Western Front. They were covered by wooden boards known as “duck boards,” which raised the standing area and kept soldiers’ feet somewhat dry. As well, sandbags could be thrown into the bottom of trenches as a method of soaking up some of the water.
Maurice Rose lived through the horrors of the First World War and bravely returned to the battlefield when the global population was plunged into conflict once more. The Jewish major general never lived to see the German surrender in 1945, but his legacy is an inspiration to servicemen and civilians alike.
Maurice Rose was born to serve
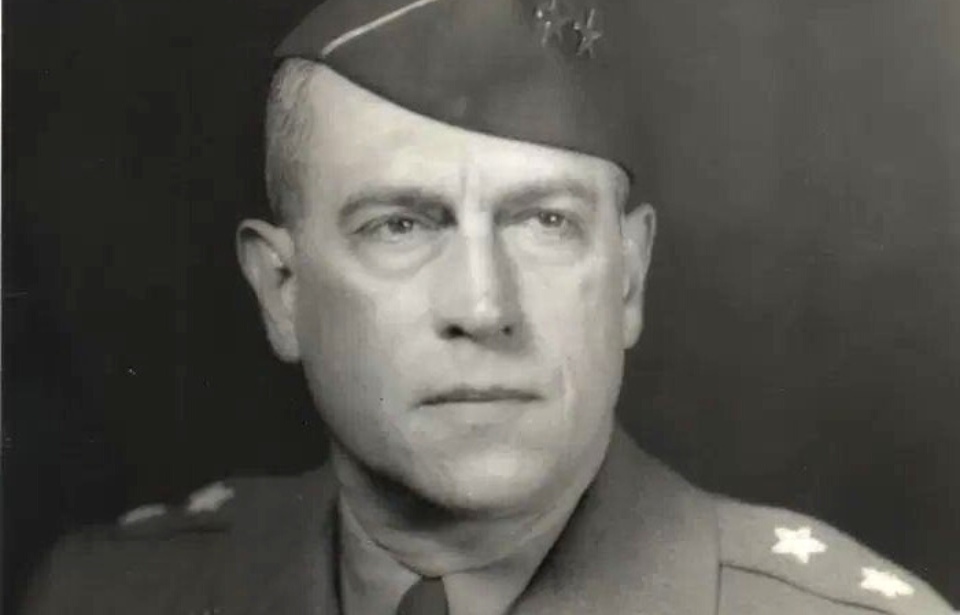
Maurice Rose, 1944 + Plaque marking the birthplace of Maurice Rose. (Photo Credit: 1. Matthewdkaufman / Wikimedia Commons / Public Domain 2. Joe Mabel / Wikimedia Commons CC BY-SA 3.0)
Maurice Rose was born on November 26, 1899 to Samuel and Katherin “Katy” Rose. Intelligent beyond his years, he grew up in Denver, Colorado. According to his high school classmates, he’d always had a dream of serving in the US military, with a cartoon in the school newspaper once depicting him carrying a rifle.
In 1916, the 17-year-old Rose lied about his age to become a private in the Colorado National Guard. He hoped to participate in the Pancho Villa Expedition. However, six weeks after his enlistment, he was discharged when his commander learned his true age.
In 1917, Rose, again, enlisted, this time with his parents’ permission. Similar to before, he lied about his age, this time to become eligible for Officer Candidate School (OCS), graduating four months after the United States entered the First World War. He was commissioned as a US Army Reserve second lieutenant of infantry and given command of a platoon with the 353rd Infantry Regiment, 89th Infantry Division.
After training at Camp Funston, Kansas, Rose was promoted to temporary first lieutenant. In late May 1918 – the final year of the war – the 89th arrived in France.
Maurice Rose’s service during World War I
Members of the 353rd Infantry Regiment, 89th Infantry Division celebrating with citizens in Meuse, France following the conclusion of World War I. (Photo Credit: Bettmann / Getty Images)
Maurice Rose’s division received additional training while in Europe, before taking up position near Metz, in preparation for the Meuse-Argonne Offensive. During a German artillery barrage, Rose was hit by shrapnel and wounded. Even with his injuries, which included a concussion, he refused to be evacuated. However, he was ultimately removed from the battlefield after collapsing from exhaustion.
After just a few days in hospital, Rose left, against the doctor’s wishes, to return to his unit. Confused as to his whereabouts, medical officials accidentally marked him as killed in action (KIA), and a letter was sent home to his parents to inform them of their loss. This was eventually corrected when the young soldier was located.
Rose stayed with the 353rd Infantry Regiment throughout the remainder of the war, and he remained in Germany after the Armistice. He returned home in 1919, and worked as a traveling salesman until he was accepted back into active duty as a first lieutenant. A day later, he was promoted to the rank of captain and served with several regiments at Fort Douglas, Utah, before becoming the adjutant of the 38th Infantry.
Throughout the remainder of the 1920s and early 30s, Rose served as an instructor for the Reserve Officers’ Training Corps and New Mexico National Guard. He was promoted to major in 1936, and, in 1939, was posted to Fort George G. Meade, Maryland as an instructor at the Third Corps Area Command and Staff School.
Rising up the military ladder during World War II
M4 Sherman tanks with the US 3rd Armored Division on a snow-covered road in Manhay, Belgium, 1945. (Photo Credit: Photo12 / UIG / Getty Images)
Maurice Rose was assigned to Fort Knox, Kentucky when the US joined the Second World War in 1941. Now a lieutenant colonel, he commanded the 3rd Battalion, 13th Armored Regiment, before being reassigned as the executive officer of the 1st Armored Brigade, 1st Armored Division. One newspaper reporter caught sight of Rose while watching the brigade training and referred to him as “probably the best-looking man in the army.”
In 1942, Rose arrived in North Africa with the 2nd Armored Division and was soon promoted to colonel. The Americans defeated the German forces in Tunisia, with Rose playing a large role in negotiating the terms of the German unconditional surrender with Generalmajor Fritz Krause.
Still with the 2nd, Rose moved up the ladder once more to become a brigadier general. He led his team in Combat Command A through Sicily, and, in 1944, succeeded Maj. Gen. Leroy H. Watson as commander of the 3rd Armored Division. Rose also earned a promotion to the rank of major general during this time.
After the success of Operation Overlord, Rose led his men to Belgium, where they became the first tank unit to enter Germany – the first in many notable accomplishments along the German front. During the Battle of the Bulge, the 3rd helped to beat back the German offensive in the Ardennes, before moving on to Cologne.
Maurice Rose’s senseless death
Memorial Day service at the Netherlands American Cemetery, 1945. (Photo Credit: CORBIS / Getty Images)
While navigating a forested area outside of Paderborn in northeastern Germany on March 30, 1945, the 3rd Armored Division received reports that the units behind them were being held up by German troops. As they turned around, they were gunned down and surrounded by the SS Panzer Brigade Westfalen.
In an attempt to escape the encroaching Germans, Maurice Rose and his men turned their Jeep toward the main road, which was occupied by even more German Tiger II tanks. The driver tried to maneuver around the tanks, but one cut them off while the lead Jeep managed to escape.
Rose and his aide, Maj. Robert Bellinger, got out of the Jeep as the German tank commander opened his hatch. Approaching the armored vehicle with their arms raised, the commander aimed a machine pistol at Rose, who was reaching toward the holster on his hip. A spray of shots rang out, with 14 striking the major general, killing him on the spot.
Bellinger and the others managed to escape, and they later returned to retrieve Rose’s body. The decorated serviceman and heroic leader died within months of the war’s end. He was buried at the Netherlands American Cemetery with the distinction of being the highest-ranking American killed by enemy fire in Europe during the course of the war.
US leaders were outraged over the senseless death of such a decorated commander, and a brief investigation was opened to determine if he was the victim of a war crime. However, it was impossible to determine if Rose had been reaching for his pistol to surrender or retaliate. The German tank crew also had no idea he was a high-ranking officer. As such, the case was ultimately dismissed.
Maurice Rose was survived by his wife and two sons, both of whom were named after the career military man. Maurice “Mike” Rose followed in his father’s steps, serving in World War II, Korea and during the Vietnam War, while Maurice Roderick “Reece” Rose opted to pursue a career in law enforcement.
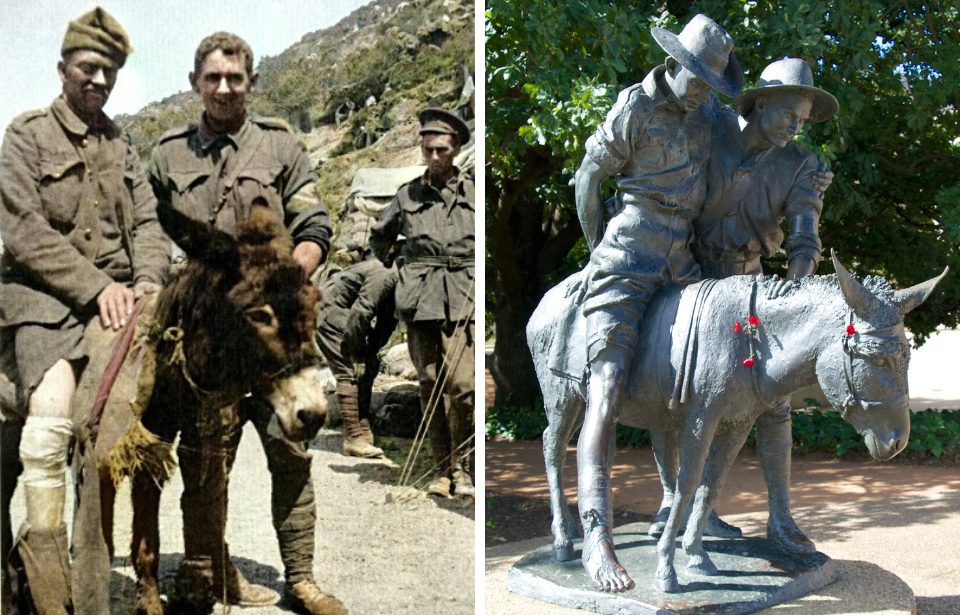
Best known as the “Man with the Donkey,” John Simpson Kirkpatrick was one of many larger than life figures who landed with the ANZACs during the Gallipoli Campaign. Serving with the 3rd Australian Field Ambulance, he and his donkeys aided their comrades during the offensive, becoming almost-legendary figures by the time the First World War came to an end.
John Simpson Kirkpatrick’s early life
For years, the man in this image was incorrectly identified as Pvt. John Simpson Kirkpatrick. In actuality, he’s Lt. Richard Alexander Henderson of the New Zealand Medical Corps. (Photo Credit: Sergeant James G. Jackson / Australian War Memorial / Wikimedia Commons / Public Domain)
John Simpson Kirkpatrick was born on July 6, 1892 in County Durham, England. He began working with donkeys as a youngster on his summer holidays, a skill that would place him in good stead in the years to come.
When he turned 16, Kirkpatrick volunteered as a gunner for the Territorial Force, before joining the British Merchant Navy in 1909. When his ship was docked in New South Wales, Australia in May 1910, he deserted his crew and took odd jobs around the country.
After the First World War broke out in 1914, Simpson enlisted in the Australian Army, in part to return to England. On his forms, he declared himself to be “John Simpson,” likely dropping “Kirkpatrick” to make it difficult for officials to identify that he’d deserted his ship years prior.
3rd Australian Field Ambulance
Australian 3rd Field Ambulance, with Pvt. John Simpson Kirkpatrick standing third from the left, October 1914. (Photo Credit: Unknown Author / Australian War Memorial / Wikimedia Commons / Public Domain)
John Simpson Kirkpatrick enlisted as a field ambulance stretcher bearer in Perth on August 23, 1914, after which he began training at Blackboy Hill Training Camp. Following this, he was assigned to the 3rd Australian Field Ambulance, regimental number 202, with whom he served for the entirety of his time overseas.
The group were sent to take part in the Gallipoli Campaign, which, at the time, was already well underway, landing at ANZAC Cove on April 25, 1915 as part of the 1st Australian Division. It didn’t take long for Kirkpatrick to get into the swing of things, carrying injured soldiers from the frontlines to receive medical attention.
It was on April 26 that he made the decision that would become the source of his fame: using a donkey to transport the wounded servicemen, instead of carrying them on a stretcher or over his shoulders. Kirkpatrick and his donkey became a common sight on the frontlines; he sang and whistled while the pair walked along the battlefield.
Duffy the donkey
Pvt. John Simpson Kirkpatrick with Duffy the donkey during the Gallipoli Campaign, 1915. (Photo Credit: J.A. O’Brien / Australian War Memorial / Wikimedia Commons / Public Domain)
Although Duffy is perhaps the best known of John Simpson Kirkpatrick’s donkeys, sources indicate he likely had multiple – or, at the very least, different nicknames for the same one: Duffy No. 1, Duffy No. 2, Murphy, Abdul and Queen Elizabeth.
It wasn’t long before some of the other stretcher bearers began using donkeys alongside Kirkpatrick, as it made it easier to move the injured over the terrain and away from the frontlines. His actions were highly praised by Gen. John Monash, who said:
“Private Simpson and his little beast earned the admiration of everyone at the upper end of the valley. They worked all day and night throughout the whole period since the landing, and the help rendered to the wounded was invaluable.
“Simpson knew no fear and moved unconcernedly amid shrapnel and rifle fire, steadily carrying out his self-imposed task day by day, and he frequently earned the applause of the personnel for his many fearless rescues of wounded men from areas subject to rifle and shrapnel fire.”
John Simpson Kirkpatrick is killed in action
Pvt. John Simpson Kirkpatrick’s headstone. (Photo Credit: Gsl / Wikimedia Commons CC BY-SA 3.0)
Sadly, John Simpson Kirkpatrick’s dedication to the wounded was short-lived, as he was killed in action (KIA) during the Third Attack on ANZAC Cove on May 19, 1915. He was only 22 years old.
Sources indicate Kirkpatrick was struck by a machine gun bullet that traveled through his heart. He’d been attempting to bring soldiers back from the front. Reports also state that the donkey he had with him that day was spared from the same gunfire, with his comrades continuing to look after the animal.
The commanding officer of the 21st Kohat Indian Mountain Battery wrote, “[Simpson] had many donkeys and men killed beside him but led a charmed life till 19th May. We treasured his last donkey and evacuated it safely at the end with a view to presenting it to Australia but it was stolen from our mule lines in Mudros.”
Other sources say that one of Kirkpatrick’s donkeys was passed along to Lt. Richard Alexander Henderson of the New Zealand Medical Corps, a man often confused as Simpson in images from the Gallipoli Campaign.
Remembering John Simpson Kirkpatrick
Statue dedicated to John Kirkpatrick Simpson and Duffy the donkey at the Shrine of Remembrance in Melbourne, Australia. (Photo Credit: Gsl / Wikimedia Commons CC BY-SA 3.0)
Although he only served for just over three weeks, John Kirkpatrick Simpson became an almost mythical figure in the years that followed his death. He is credited with saving 300 men over his 24 days of service. Many were said to have been seriously wounded, yet it has been pointed out that only those with more minor wounds would have been able to travel on Simpson’s donkey.Those with injuries to the head or chest couldn’t have ridden down a valley, even with the assistance of the handler. Nonetheless the stories persist, and numerous memorials to the “Man with the Donkey” still exist. He has even been portrayed in films, television shows and on postage stamps.
Despite his efforts, Kirkpatrick never received the Victoria Cross he was nominated for, due to a clerical error, one which has never been remedied.